
One of the features I really like about Acumatica is the ability to configure so many aspects of the system declaratively, meaning no programming is required! Attributes are a perfect example of this. Here’s a handy tip on using attributes on a dashboard.
Because every business is different, there will frequently be data elements required by your company’s business model that are not a part of your standard software package. Attributes provide the capability to add an unlimited number of user-defined fields to Acumatica screens. Once you create an attribute you simply add it to the appropriate screens, and can easily use it in filters, reports, and dashboards. The best part is that no C# knowledge is required to take advantage of this feature!
NOTE: In earlier Acumatica releases, attributes were available only on Leads, Business Accounts, Contacts, Cases, Opportunities, Marketing Campaigns, Inventory Items, Projects, and Employees. Beginning with Acumatica 2018R2 this functionality was expanded to allow attributes to be added as user-defined fields on numerous transactional data entry screens, for example Expense Receipts, Invoices and Memos, Sales Orders, Shipments and many many more. Both standard attributes and user-defined fields on transactional data can be included on dashboards.
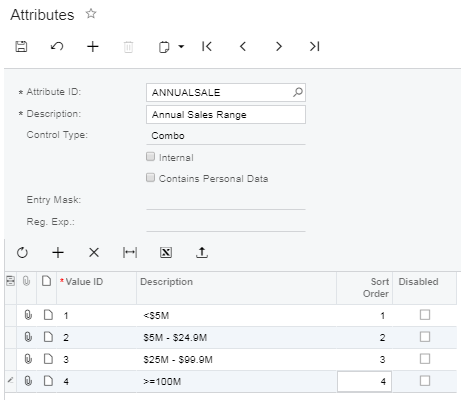
In this article, I will show you how to easily create a new “Annual Sales Range” attribute for business accounts, and then use this new field in a dashboard widget with drilldown capability.
The first step is to define the attribute on screen CS205000. Attribute definitions are system wide, so once you’ve defined an attribute you can use it anywhere in the system. There are five options for attribute type: text, combo, multi select combo, checkbox, and datetime. For this example we will define the ANNUALSALE attribute as a combo (dropdown) box.
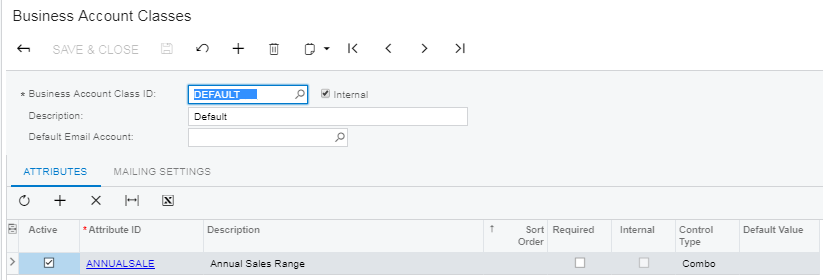
In order to use our attribute, I need to associate it with one or more Acumatica object classes. For example, to add this field to Business Accounts, I will add the ANNUALSALE attribute to the default Business Account class. If my company has multiple account classes, the list of attributes associated with each account class can differ.
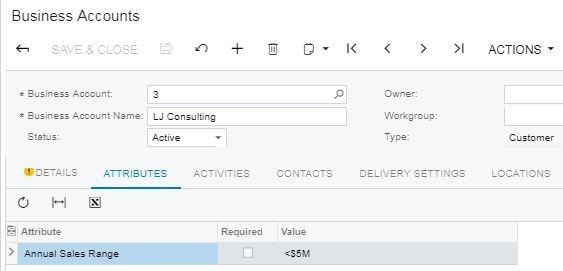
For Leads, Business Accounts, Contacts, Cases, Opportunities, Marketing Campaigns, Inventory Items, Projects, and Employees, once I’ve associated the attribute with the appropriate class, the field will be available on the Attributes tab of the relevant screen. For transactional data screens the attribute can now be added as a ‘User-Defined Field’. Here we can see the new attribute on the Attributes tab of the Business Account screen.
The real magic occurs once we expose our new attribute in a Generic Inquiry. Some tips on building generic inquiries will be the subject of another blog post, but if you’re new to Acumatica data, I’ve found that the easiest way to build a custom Generic Inquiry is to copy from an existing one. This will make it easier to find the data tables you need! Most of the list view screens in Acumatica are based on Generic Inquiries. Once you find the screen with the data that you need, simply click Customization and then Edit Generic Inquiry in the upper right-hand corner of the screen. Rather than editing the standard generic inquiries, I would recommend that you make a copy. You can also export and import generic inquiries to XML from this screen.
For the purposes of this example, I’ve created a new generic inquiry using the BAccount table. Because I added the ANNUALSALE attribute to the Business Account class, it now appears as an option on the Data Field dropdown.