
With Acumatica ERP , check reconciliations are straightforward.
Previously I discussed how to group multiple checks into a single deposit.
Now that you’ve received a statement from the bank or credit card provider, it’s time to reconcile. First let’s review manual bank reconciliation process and then we’ll see how to make this easier.
Manual bank reconciliation
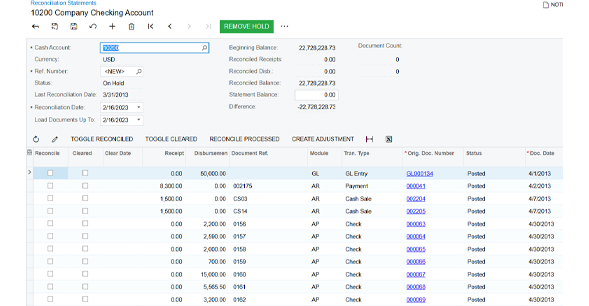
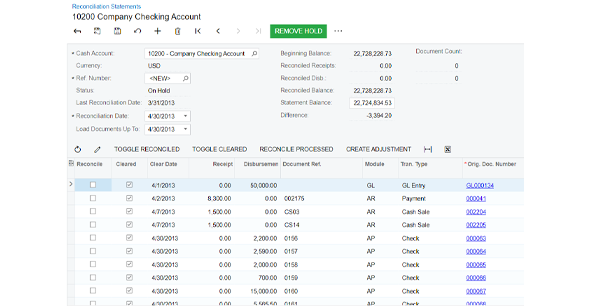
On the Bank Reconciliation Statement screen, a user selects a cash account and enters an ending statement balance and the reconciliation date. The user then reviews the statement and marks documents as Cleared or Reconciled. The Cleared check box is used to indicate that the document was cleared with the reconciliation source generally based on preliminary information. This is sometimes done throughout the month. The Reconciled check box indicates that the document is included on the reconciliation statement.
As the user selects the Reconcile checkbox, the Difference field is calculated. A Difference of $0 indicates that the reconciliation statement is in balance. If there is a transaction on the bank statement that is not in Acumatica (for example a bank fee or interest), the Create Adjustment button allows the user to create a cash transaction on the fly.
The manual bank reconciliation in Acumatica is straightforward, but if there are many transactions it will be time consuming. The good news is that Acumatica includes features to make this process much more efficient.
Here are the steps for a more automated bank reconciliation:
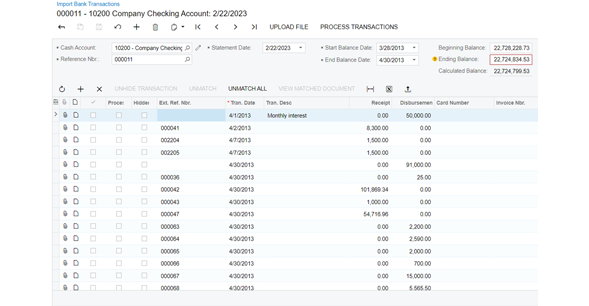
Step #1 – Import Bank Transactions
Instead of reconciling off of a paper or pdf statement, you can import bank transactions directly from an electronic file. The Upload File button is used for OBX, QBO and QFX formats. Excel files are also supported and can be imported using the File Upload icon.

Optionally, this can be further automated through the use of bank feeds which bypasses the need to manually run the import.
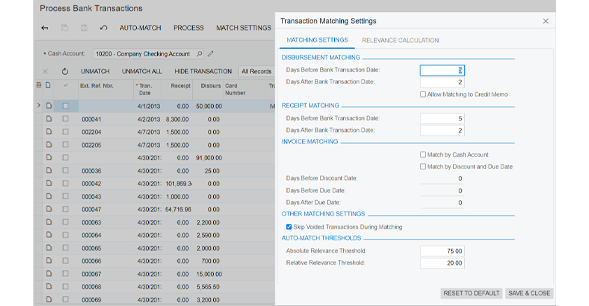
Step #2 – Process Transactions
Click Process Transactions on the Import Bank Transactions screen to open the Process Bank Transactions screen. Here you can review the Match Settings to review or adjust the Matching Settings and/or the Relevance Calculation. Then click Auto-Match to proceed with the automated matching.
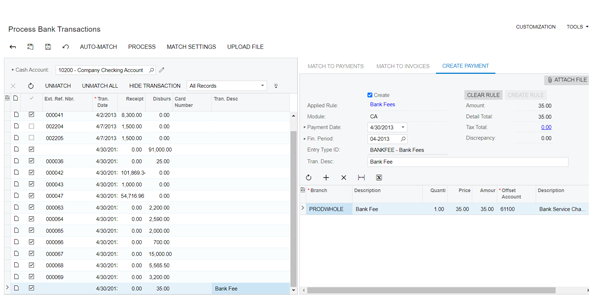
Step #3 – Review Unmatched Transactions
Unmatched transactions can be matched manually to an existing payment or invoice. A single bank transaction can also be matched to multiple payments or invoices.
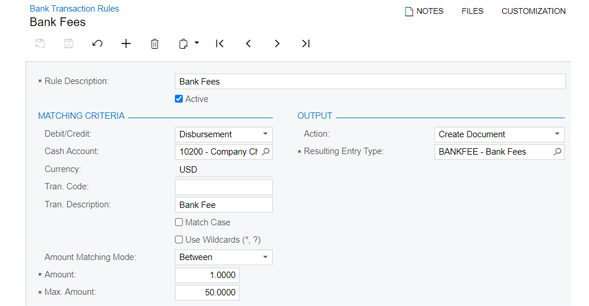
Some bank transactions such as interest or bank fees are typically not known until the statement is received. Similar to the Create Adjustment button that is used on the manual bank reconciliation, there is the ability to create a cash entry on the fly. The Entry Type defines the GL account for the new cash entry.
The specification for the new cash entry is saved as a Rule which can be adjusted as needed. The next time that a similar bank transaction is processed, Acumatica will be able to apply the rule automatically.
Step #4 – Create a Reconciliation Statement
Once all of the bank transactions have been matched you’re ready to revisit the Reconciliation Statements screen that we saw earlier in the manual bank reconciliation. Create a new reconciliation statement and enter the Reconciliation Date and the Statement Balance.
The Acumatica transactions through the selected Load Documents Up To Date are displayed, and the processed transactions from the previous step are automatically marked as Cleared. Click Reconcile Processed to mark these transactions as Reconciled. The Difference should now be 0.
The bank reconciliation is complete. Remove the Hold, Release, and run a Reconciliation Report.
Parallel Solutions can help your organization to be more efficient. Check out our blog for more Tips and Tricks!
#Acumatica #BankReconciliation #ParallelSolutions